The Fastest Way to Make Sermon Clips for Social Media
Oct 07, 2022First things first: if you’re thinking of turning your Sunday sermons into short videos for social media, CONGRATULATIONS! You’re already on the right track.
Short-form videos are dominating on every single social media platform, be it TikTok, Instagram Reels, Youtube Shorts, and even Facebook. And lucky for you, you’ve already got tons and tons of material to work with every Sunday! By creating sermon highlight reels, you are increasing the online reach and engagement of your church. So, great job.
Now, this is the quickest and easiest way to get the job done: it’s a software called Descript. And no, we aren’t being paid to say this— we just love their product that much.
What is Descript?
Descript is a really cool program that automatically transcribes audio/video files you upload. It also allows you to delete “uhm’s,” “uh’s,” and other filler words directly from your transcript. Plus, they have an easy-to-use built-in video editor so you can add captions and music to your sermon clips, and export them in whatever size or format you need.
For a full overview of all of Descript’s features, watch this fun introductory video.
Pro-Tip:
If your church is on a tight budget, Descript offers a discounted plan for nonprofits at just $5 per month, with 4 hours of transcription.
How to quickly create sermon clips using Descript
1. Install Descript
Download Descript for free here. Once installed, launch Descript. Click New > Project and give your project a name. Click Create Project.

2. Upload your sermon video/audio file
On the left sidebar, click the three dots next to Project Files > Files From Computer.

3. Auto-transcribe the file
Once your file is uploaded, click Transcribe File in the lower left window that appears. A window will appear to notify you that the process has begun. Under Optional Actions, check the box that says Create a Composition.


4. Select a clip for social media
Spend some time here thinking about which part of the sermon will make the most impact on your audience online. Optimize very carefully intentionally for the first 2-3 seconds of your video because that is what will make people decide whether or not they should keep watching. For more tips on selecting the best snippets for social, check out this post on the Church Communications Facebook group (and if you haven’t joined it yet, now’s the time!)

Once you have selected your clip, highlight that portion of the transcript. Right click and select Clip to Composition > New. This will create a new composition with just that selected portion.
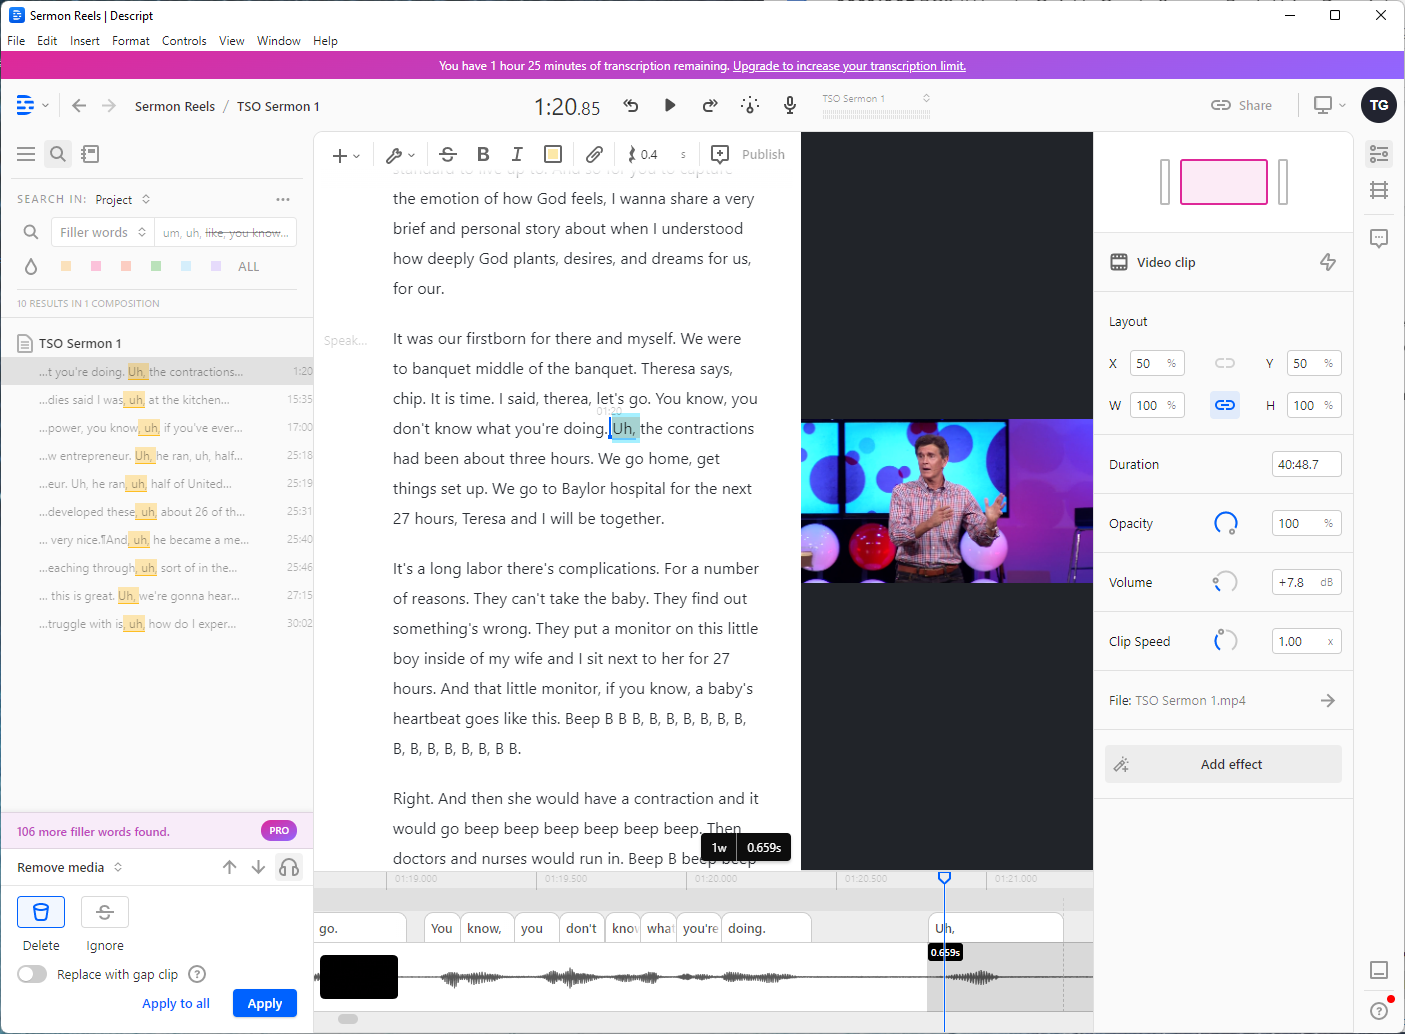
5. Edit the transcript
On the left sidebar, click the magnifying glass icon and filter out filler words or word gaps. To correct any errors in your transcript, place the cursor over a word and hit E on your keyboard. A dialog box will pop up for you to replace the word.
Pro-Tip:
Hover over a word and hit Q to automatically capitalize.
6. Change the aspect ratio to 9:16
At this size, you can upload your video to TikTok, Youtube Shorts and Instagram Reels (which can also be distributed on Facebook). To change your video’s aspect ratio, click the multiple-screen icon above your video. Select Portrait (9:16) from the Orientation drop-down menu.

To fill the entire frame, click on your video clip and adjust its width and height percentage in the clip inspector (Ctrl + Alt + I). Make sure the link icon is turned on, so that the video maintains its proportions.

7. Add captions
Now, to add captions, highlight your entire transcript then click on the + icon on the toolbar. This will open up a dialog box. Scroll until you see Fancy Captions then click on it. Customize your captions using the clip inspector window on the right side of your window. You can adjust its position, font style, size, text alignment, opacity, background, stroke, shadow and blur— tons of options in store!

8. Export and share your video
When your video is ready, click Share on the upper right corner of your window. Export your file so you can upload it to your social channels from your computer or phone, or share it straight to your church’s Youtube channel.

And, viola! Your sermon clip is ready to go on social media.
How to streamline the process of creating sermon clips every week
We hope by now, you see what we’re seeing: a super efficient way to create not just one clip to go out on Monday, but MULTIPLE clips throughout the rest of the week.
With Descript, you can select multiple portions of the sermon, and create highlight reels for each of those with ease.
Plus, Descript also lets you copy and paste the way your caption styles, so you can use them consistently across all your highlight reels.
There’s so much more you can do with your videos, but we just showed you how to do a basic sermon highlight reel. To see what more you can do with Descript’s video editor, check out their Youtube channel for in-depth tutorials or their Help Center for skimmable articles.
What slows you down the most when creating your sermon recap clips for social media?
Let us know in the comments 👇👇👇